

Focusrite Scarlett Solo 4th Generation Review, Setup & Tips
Why I Chose This Over Others
I recently upgraded my microphone to an XLR mic for better audio quality in my voice-overs and podcasts—and with that change came the need for a proper audio interface.
After some research, I decided to go with the Focusrite Scarlett Solo 4th Generation. It’s affordable, easy to use, and widely praised as one of the best entry-level interfaces for solo creators. In this post, I’ll walk you through what comes in the box, what each input and control does, and how to set it up with Focusrite Control 2. I’ll also share some real-world impressions and explain why I ended up adding a mic activator to the setup.
🎥 Watch the full video review here: https://youtu.be/PuhVoqSKedY
Why I Didn’t Need Two XLR Inputs
For my use case—voice-overs, solo podcasts, and narration—I simply don’t need two XLR inputs. I’m recording one voice at a time, not a multi-host podcast or live music session. A second XLR input would sit unused 99% of the time.
The Scarlett Solo is designed exactly for this scenario: one high-quality mic input and one instrument input, without forcing you to pay for extra hardware you don’t actually need. If you regularly record two speakers at once, a 2i2 makes more sense—but for solo creators, the Solo keeps the setup simpler, more affordable, and easier to manage.
In short, I prioritized quality per input, not quantity.
Why Cheaper Interfaces Often Have Noisier Preamps
At the lower end of the price spectrum, audio interfaces often cut costs where it matters most: the preamps. Cheaper preamps tend to introduce more self-noise, especially when you push the gain higher—which is exactly what happens when using dynamic microphones for spoken word.
This becomes noticeable as hiss or background noise once you approach the upper end of the gain dial. You can try to fix it in post, but noise reduction always comes at the expense of vocal clarity.
The Scarlett Solo’s preamps are noticeably cleaner than budget interfaces in the same price range. Even when pushing the gain, the noise floor remains low and controlled. That clean baseline is also why pairing it with a mic activator works so well—you’re boosting a clean signal, not amplifying noise.
Why the 4th Generation Specifically (vs Older Scarletts)
Focusrite has quietly refined the Scarlett line over multiple generations, and the 4th Gen is the most polished version yet—especially for spoken-word creators.
Compared to older Scarlett models, the 4th Gen offers:
- Improved preamp headroom, which helps when using dynamic microphones
- Lower noise floor across the gain range
- Enhanced Air mode, which sounds more natural and less harsh than earlier versions
- Better headphone output, with more usable volume and clarity
- Updated Focusrite Control 2 software, which is faster, cleaner, and easier to use
Older Scarletts are still perfectly usable, but the 4th Gen feels more confident and refined. It’s the first version where I didn’t feel like I was “working around” limitations—it just worked the way I expected it to.
For anyone buying new today, the 4th Gen is absolutely the one to get.
Who This Is NOT For
While the Focusrite Scarlett Solo 4th Gen is an excellent interface, it isn’t the right choice for everyone.
This interface is not ideal if you:
- Record multiple speakers at the same time
If you run a two-host (or more) podcast and need two XLR microphones recording simultaneously, the Scarlett Solo will feel limiting. In that case, the Scarlett 2i2 or a larger interface makes far more sense. - Need onboard mixing, effects, or streaming controls
The Scarlett Solo is a clean, straightforward audio interface—not a mixer. If you want physical faders, sound pads, voice effects, or live routing controls for streaming, something like the GoXLR Mini or RodeCaster lineup would be better suited. - Rely heavily on ultra-low-output dynamic microphones without an activator
While the Solo’s preamps are clean, very gain-hungry microphones (like the Shure SM7B or Rode PodMic) benefit greatly from a mic activator. If you don’t want to use an inline preamp at all, you may prefer an interface with more built-in gain headroom. - Plan to record full bands or complex music setups
With only one XLR input and one instrument input, the Scarlett Solo isn’t designed for multi-mic drum kits, live band recording, or advanced studio sessions.
That said, if you’re a solo creator, podcaster, voice-over artist, or musician recording one source at a time, these limitations likely won’t matter—and that’s exactly where the Scarlett Solo shines.
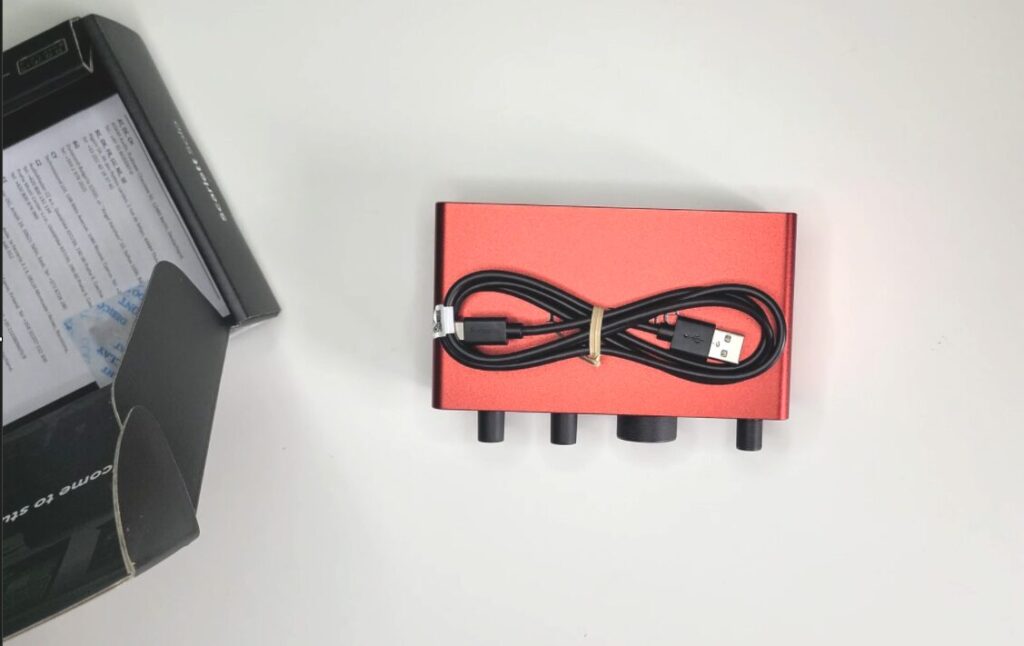
What’s in the Box?
When you unbox the Focusrite Scarlett Solo 4th Gen, you’ll find:
- The Scarlett Solo audio interface
- A USB-C to USB-A cable
- A quick start guide with instructions to download the software bundle
Everything is plug-and-play, and setup is beginner-friendly.
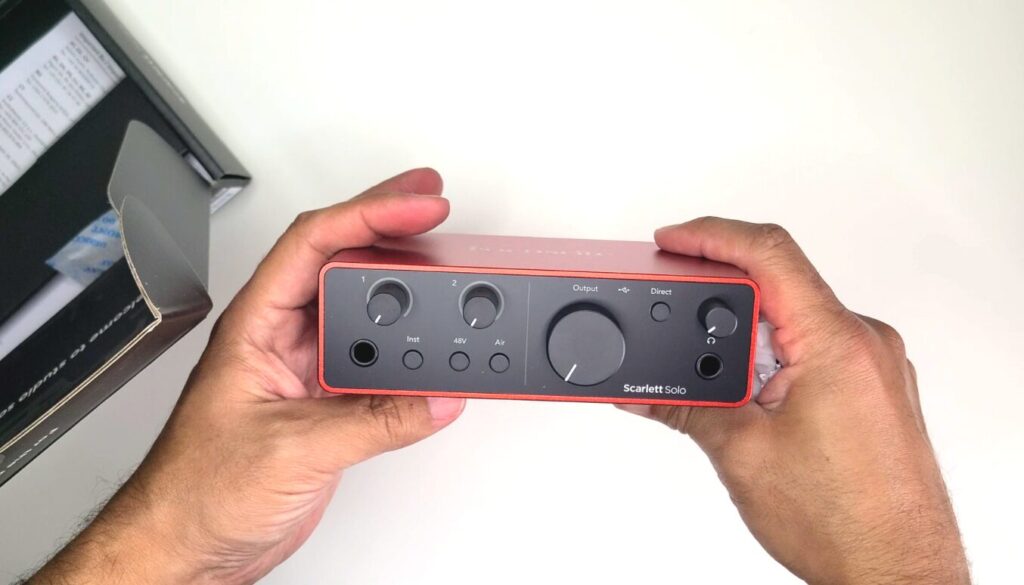
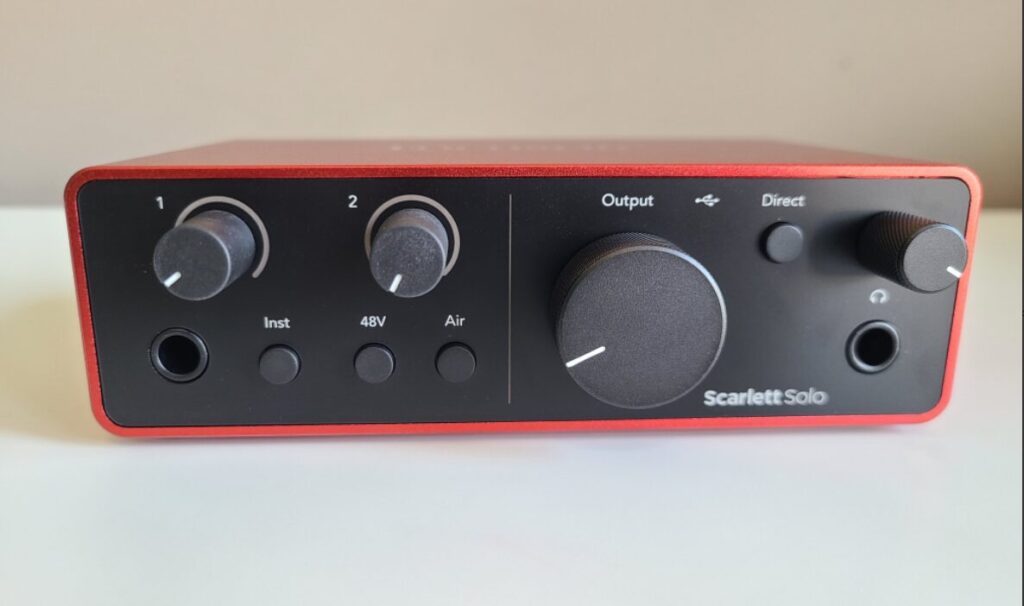
Front & Back Panel Breakdown
Front Panel Features:
- ¼-inch Instrument Input: Great for guitar, bass, or keyboard
- Gain Knob 1: Controls instrument input level
- Buttons:
- Inst: Toggles between instrument and line-level
- 48V Phantom Power: Required for condenser mics and mic activators
- Air Mode: Adds brightness and clarity to vocals
- Gain Knob 2: Controls XLR microphone input
- Monitor Output Knob: Adjusts volume to speakers
- Direct Monitor Button: Hear yourself live with zero latency
- ¼-inch Headphone Jack: With its own volume knob
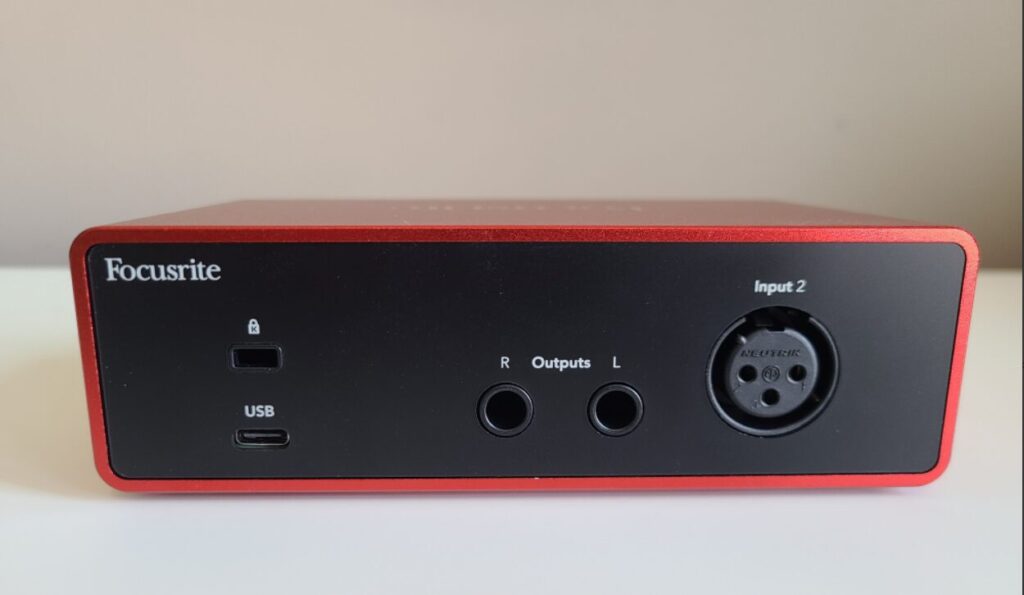
Back Panel Features:
- XLR Mic Input: Accepts dynamic or condenser microphones
- ¼-inch Left/Right Outputs: For connecting studio monitors
- USB-C Port: Provides power and data connection to your computer
- Kensington Lock Slot: For securing the unit in shared spaces
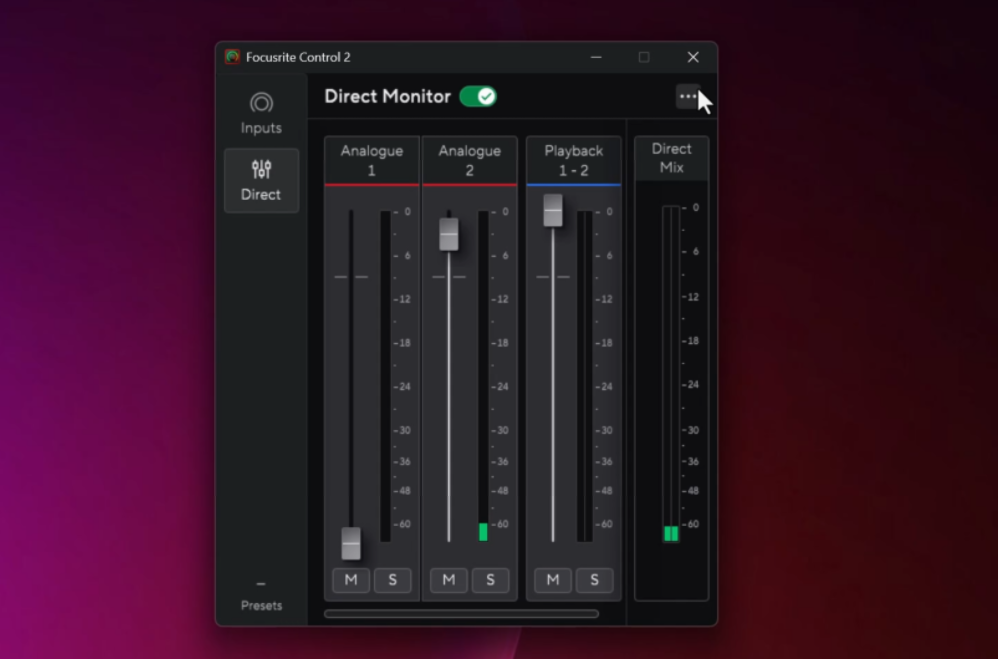
Software Setup: Focusrite Control 2
Once the Scarlett is connected, install Focusrite Control 2. The software is essentially a mirror of the hardware but gives you:
- Visual input levels in dB
- Toggle switches for Air, Phantom Power, and Instrument mode
- Full control over Direct Monitoring mix and headphone balance
It’s super intuitive, even for beginners.
Included Software Bundle
Focusrite also includes a generous software bundle with your purchase:
- Ableton Live Lite – for loop-based music production
- Pro Tools Intro – a trimmed version of the industry-standard DAW
- Hitmaker Expansion Pack – includes effects and plug-ins for EQ, compression, reverb, and more
Scarlett Solo vs USB Microphones
USB microphones are popular because they’re simple: plug them in and start recording. For casual use, they work fine. But once you care about sound quality, control, and long-term flexibility, an XLR setup with the Scarlett Solo has clear advantages.
Sound Quality
USB mics use built-in preamps and converters that are often limited by cost and space. The Scarlett Solo’s dedicated preamps are cleaner, quieter, and provide more usable headroom—especially noticeable with dynamic microphones.
Control and Monitoring
With the Scarlett Solo, you get physical gain control, zero-latency direct monitoring, phantom power, and Air mode. USB mics usually rely on software monitoring, which can introduce latency and offers far less hands-on control.
Upgrade Path
An XLR setup lets you upgrade individual components over time. You can change microphones, add a mic activator, or expand your signal chain without replacing the interface. With USB mics, the preamp, converter, and mic are all locked into a single device.
Workflow
USB mics are convenient for quick recordings, but for regular podcasting or voice-over work, the consistency and flexibility of an interface like the Scarlett Solo make a noticeable difference.
Real-World Review & Mic Activator Recommendation
After using the Scarlett Solo for several recording sessions, I was impressed with the sound quality. The built-in preamps are quiet and clean, and the Air mode adds a nice professional edge to vocal recordings.
However, I did find that when using a dynamic mic like the Rode PodMic, I had to turn the gain up pretty high. It worked, but I was close to the top end of the dial—which can introduce noise on some setups. To solve this, I added a mic activator between the mic and the interface, and the difference was immediate.
Here are three of the best mic activators I recommend:
- SE Electronics DM1 Dynamite – compact and powerful; this is the one I personally use
- Cloudlifter CL-1 – industry standard, especially popular with the Shure SM7B
- Triton Audio FetHead – another solid inline preamp with transparent gain
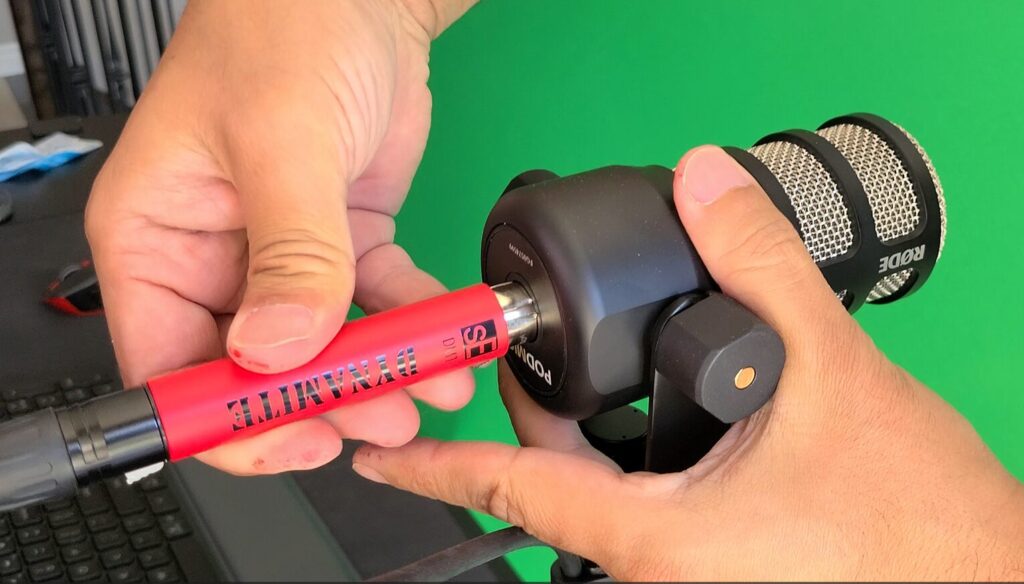
With the DM1 Dynamite, I found the best results by keeping the Scarlett’s gain knob between 9 and 12 o’clock. Clean, powerful signal with zero hiss.
Long-Term Use & Reliability
After extended use across multiple recording sessions, the Focusrite Scarlett Solo 4th Gen has proven to be reliable and consistent. Once it’s set up, it simply works—no random disconnects, no driver crashes, and no need to constantly reconfigure settings between sessions.
The unit runs cool, even during longer recording sessions, and the knobs and buttons still feel solid with no looseness or wear. The gain knobs have a smooth, predictable sweep, which makes dialing in levels quick and repeatable.
On the software side, Focusrite Control 2 has been stable and responsive. Settings like Air mode, phantom power, and direct monitoring are remembered correctly between restarts, which is something I really appreciate. There’s no friction in the day-to-day workflow—you plug in, open your DAW, and start recording.
Final Thoughts
If you’re just getting into podcasting, voice-over work, or home studio recording, the Focusrite Scarlett Solo 4th Gen is a fantastic entry point. It’s compact, reliable, and sounds great right out of the box. Add a mic activator if you’re using a dynamic mic, and you’re good to go.
👉 Watch the full video walkthrough and review here:
https://youtu.be/PuhVoqSKedY
Filed under: Tech - @ July 28, 2025 2:23 pm